
To help you safely master the features and functions of the Jakemy UC01 ultrasonic cutter, please be sure to read this important guide, which covers power requirements, operating modes, and safety procedures.
🔌 1. UC01 Power Source Clarification
UC01 is corded-only (No battery):
Must connect to a 15V=2A or 12V=2.5A power source (USB-C plug or power bank).

You must use a power plug with a Type-C interface.

Explains on Pledging Power Adapters Plug
On the UC01 campaign page, we have removed the power plug from the UC01 kit. This reduces the selling price by $19 (with a material cost of $9) and offers it (selling price $4) at a loss of $5 to all backers who don't have the relevant plug.
- Firstly, this allows more backers to experience the expensive Ultrasonic Cutter and makes it easier for backers to shop for the appropriate plug, as the kit includes five sizes (AE, EU, JP, UK and US), which would cause problems with kit selection.
- Secondly, we have added a mandatory question about purchasing a power plug to the PledgeBox survey to remind all backers whether they have the relevant plug. Despite multiple reminders in multiple places, some backers did not take this seriously.
Didn’t buy our $4 adapter? Purchase compatible Power Adapters Plug from Anker, UGREEN (35W+) on Amazon site, or our retail site. If you are only purchasing a power plug, it is not recommended to buy it at our retail store. Because including the shipping cost, it might not be more cost-effective than placing an order on Amazon.
⚙️ 2. Operation Modes Explained

Mode #1: Auto Mode (The screen displays 'A')
- The ultrasonic cutter will switch to automatic cutting mode when the Mode Button is pushed to the Auto Mode position.
- In this state, it will run directly, thus enabling uninterrupted cutting operation without having to keep the Inching Switch pressed. In this mode, it has a strong output and is suitable for cutting harder materials.
- In the automatic cutting mode, the light at position 1 will remain on constantly. The Inching Switch at position 2 does not need to be pressed and will illuminate blue. The screen at position 3 will stay on the current interface and prompt the usable time in real time.

Mode #2: Off Mode (The screen displays '0')
- When the Mode Button is pushed to the Off Mode position, the ultrasonic cutter will stop running. If there is no action for more than 5 minutes, it will shut down automatically.
- In this state, pressing the Inching Switch will not produce ultrasonic vibration output. This safety feature prevents accidental activation of the cutter, reducing the risk of injury caused by unintended operation.
- In the OFF mode, the light at position 1 will not be on, the Inching Switch at position 2 will not light up, and the screen at position 3 will stay on the current interface and display the current mode in real time.

Mode #3: Low Mode (The screen displays '1')
- When the Mode Button is pushed to the Low Mode position, the ultrasonic cutter will switch to manual cutting mode.
- In this state, you need to keep pressing the Inching Switch at position 2 to get the ultrasonic output. It will have a weaker output in this mode and is suitable for cutting softer materials.
- At this time, the light at position 1 will remain on constantly, the Inching Switch at position 2 will illuminate green. The screen at position 3 will stay on the current interface and prompt the usable time in real time. Once you release the Inching Switch at position 2, the cutter will stop running.

Mode #4: High Mode (The screen displays '2')
- When the Mode Button is pushed to the High Mode position, the ultrasonic cutter will switch to manual cutting mode.
- In this state, you need to keep pressing the Inching Switch at position 2 to get the ultrasonic output. In this mode, its output will be strong and suitable for cutting harder materials.
- At this time, the light at position 1 will remain on constantly, the Inching Switch at position 2 will illuminate green. The screen at position 3 will stay on the current interface and prompt the usable time in real time. Once you release the Inching Switch at position 2, the cutter will stop running.
Thermal Indicator:
Still Empty Box = Safe to use

Being Filled Box = Stop and cool down!

Runtime Estimates:
Continuous Cutting:
- Dense materials (e.g., PCB): ~10 mins
- Soft materials (e.g., plastic): ~30+ mins
Interrupted Cutting:
- Intermittent use: Theoretically, it can be cut and used without any limit.
🛡️ 3. Safety First: Lid & Blade Handling

- 1. It is the lid of the UC01 ultrasonic cutter.
- 2. The child lock is in the unlocked position.
- 3. The child lock is in the locked position.
- 4. Arrow indication to open or close the lid.
Opening the Lid:
- Slide child lock to UNLOCK.
- Rotate Lid → right along "OPEN" arrow.
- Gently pull cover off.
Closing the Lid
- Insert Lid and rotate ← left along "CLOSE" arrow.
- Align anti-misalignment notch until it clicks.
- Lock child lock.
Pro Tips:
Hidden Toolkit: Pry open the gold rectangular plate on the lid for hex key/storage!

Always remove blades after use if children (<15) are present.
Download manual: [Link to be added next update]
Especially Remind:
- If you are unable to open the cutter's lid, please refer to the manual that was included with your parcel.
- Alternatively, you can watch a video showing how to open the lid on the UC01 capacity page.
- Never twist the lid forcefully before unlocking the child lock.
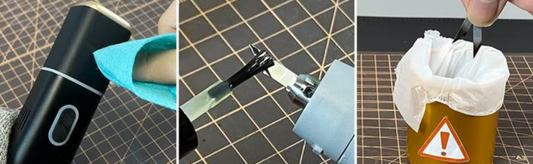
- The picture below shows that the lid was forcibly unscrewed without unlocking the child lock, causing the LED light panel to fall off.

If you encounter this situation and are confident in your soldering abilities, you could try repairing it yourself. Alternatively, you can remove the LED lights, insulate the wires to prevent short circuits, and then reinstall the lights inside the transducer's plastic casing.
- Locate the white disc shown in Figure 1. Gently pry open the circular cover to reveal the LED light disc inside.
- Figure 2 shows the lamp panel. The lamp beads face towards you. The white wire is connected to the positive pole, while the orange wire is connected to the negative pole.
- If you are not confident in your soldering skills, you can insulate these two wires separately before inserting them into the lampshade and securing the lampshade onto the transducer.
- Figure 3 shows the final state after welding.
- Please note that when inserting the lamp cover onto the transducer, it should be returned to its original position, leaving a gap. Ensure that nothing touches the transducer, as this could cause noise.


🔧 4. Blade & Polishing Stick Replacement
How can you tell the difference between a cutting blade holder and a polishing stick holder?
The blade holder has a 0.4 mm gap, while the grinding stick holder has a 1.15 mm gap.

The UC01 ABS box is equipped with a magnetic Screw Pad. This can be used to temporarily store screws, blades and other small metallic items.


Replace the Blade or Grinding Stick:
- Use included H1.5 hex bit to loosen screw (counterclockwise).
- Remove holder with thumb/forefinger.
- Insert blade fully → Reinsert holder → Tighten screw gently (clockwise).
Note that UC02 will feature larger screws!
Cutting Blade Attachment:
Extra Cutting Blade Holder (Holder*1 & Screw*3) included in PP boxes for all buyers.

Polishing Stick Attachment:
Extra Polishing Stick Holder (Holder*1 & Screw*3) included in PP boxes for all grinding or polishing stick buyers.
🎧 5. Operation Feedback of the Cutter!
Many backers reported that the cutting process was so quiet that they could not tell if the blade had started cutting or not.
- The UC01 cutter emits a sound with a frequency of 40 kHz, which is beyond the range of human hearing. That's why you couldn't hear it.
- However, when the machine is in cutting mode, a thermometer symbol will appear on the screen.
- The LED light at the blade end will also remain on when the machine is in cutting mode.
- You can also check for noise by placing the blade of the knife against a hard object.
We have added a buzzer to the UC02 cutter that will emit a soft beeping sound while the machine is operating.
If you hear a noise while cutting, it could generally be caused by one of the following reasons:
- The blade was not installed properly.
- The blade screw was not tightened.
- The blade touched a hard object.
- The blade got stuck while cutting.
The reasons why cutting is not possible are as follows:
- You didn't power on the cutter.
- You used the wrong power plug.
- Cutter were in the off mode.
- Cutter were in the manual cutting mode, but you didn't keep pressing the Inching Switch.
- You need to replace the worn-out blade, it's impossible to tell with the naked eye.
The following video was shot by me. I hope it can be of some help to you.